When someone wants to buy fake acrylic nails, they need to pay very much for it. So then why spend so much money when you can just grow your nails at home and design it beautifully.
Sometimes girls trim their nails whenever they become long forgetting that they have an urgent event coming up. It is when they start worrying and are uncertain as to how they will grow their nails again as soon as possible. So, this particular article will help all age girls some easy steps how to make fake nails at home.
This will absolutely decrease the worry of last minute shopping for fake nails, which sometimes give unpleasant results.
Firstly, you should have the basic things in your house. That are found mostly in every household. These things may be slightly opaque or transparent tape, art brushes, scissors, glitter, clear nail polish, glue, baking soda, etc. etc. for beautifying the nails.
It might be amazing for you to know that these items are enough for making fake nails at your home. The process is very easy and understandable. Read on to find out how to make fake nails at home.
How to make fake nails at home
1. Cut out your nails
Starting with the first step. Firstly, you have to cut out your nails, and place a piece of tape on the cap of your fingernail. Then look deeply at the size of your fingernail and have another cut out of the tape so that it fully covers the top part of your fingernail. It will allow your nail having a square shaped tip. Thus, your mail will be made elongated.
2. Use the buffer
Now in the second step, you have to use the buffer and rub it constantly on the part of your nail in such a way that the draft of the tape is clearly shown. By following this the line will remove making the tape clearly visible. Now, your fake nail is nearly done.
3. Use the paintbrush
Now you have to use the small paintbrush and plunge it in glue.
Then you have to employ the glue on the acrylic part of your fingernail. By doing this the upper part of the nail will be made very silky and polished.
4. Leap your acrylic nail
After all this, You have to leap your acrylic nail head in a cup of glitter. By doing this your nail will get a glowing fingertip.
It depends on your own choice that which glitter colors you want to use.
5. Baking soda
After this, you have to use the same paintbrush and plunge it in baking soda. You need to use the paintbrush that was previously plunged in the glue.
6. Baking soda glue
Now, when you plunge it in the baking soda, the glue will get a white color. Then you have to employ the baking soda glue on the remaining of your nail, except the glitter part.
Thus, your nail will get a white base coat, and will give a more professional look.
7. Last step
After all that, you have to get another paint brush and by using it to apply the glue on the glitter part of your fingernail, in such a way that you make it bright, silky and polished.
Finally, your fingernail is now ready and you have beautiful nails.
You can also repeat the same process with some other colors and enjoy.
How do you remove fake nails?
Nail art is actually quite a major craze and fun and the people who do it are actually experts considered that they keep in check with everything like color and size of the nail. When you go to a beauty parlor or saloon for these types of manicures, you will find yourself to be greatly pampered.
If your nails are short and thick, then the acrylic nails are totally what you really want! You will come to know that these are actually available in a huge variety in the market and so, you only have to actually choose what actually you want to buy according to your personal sense of style.
Most people make the fake nails beautiful, but then fail to remove it. Now, here are some tips to show how actually you can remove the fake nails!
It is a very easy and simple. If you want to go to a beautician to remove it for you then it’s okay, but However, if you want to remove the fake nails yourself then you might need to follow the following tips.
You have to keep in mind that once you are removing these off, you should be more careful and not in an aggressive way. The glue that these nails are made has a lot of toughness and you can get yourself in danger of self harm if you do not follow some perfect steps carefully. .
The fake nails can be removed very easily. You can very easily get the help of the procedure booklet or circular that comes with the kit. Below are the steps.
Steps
For using this method you will need help of one other person too to do this. This method is very much faster and easier, but sometimes it can be hurting if not do with great and extra care, but it saves a lot of time for us and also resources.
This method is not good to be used for those people who are having the peel or weak nails.
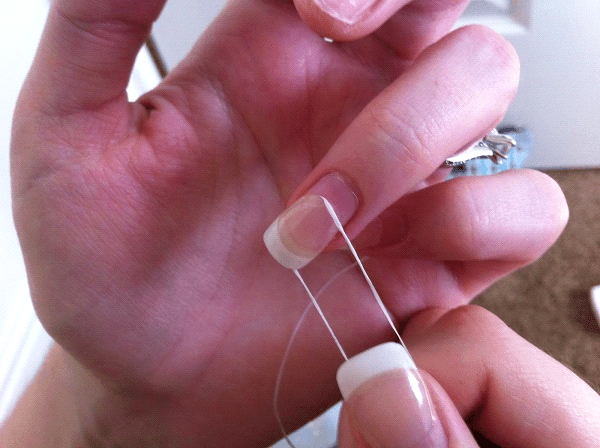
- First of all, use a metal nail file at the end of your nail to agitate the corner of the fake nail a bit there so that you leave an enough blank area for yourself to lapse the dental floss beneath the acrylic nail.
- Now you should use a tooth loss of about 1 foot, to cloak it around the forefinger of the 2nd person on each hand.
- Then you have to slip the tooth floss beneath the corner you made now.
- Keep it in your mind not to use force on anything at all. Because this will only cause you to an infection or fracture as nails are very sensitive part of the body.
- Now the 2nd body you have should use a slash motion and smoothly pull against the end of the nail bed.
- The fake nail you have must pop off.
Note:As you see that the process discussed above is very easy and time saving than other methods, but can be dangerous if not followed with great care.
really good advise
wow
Those are the ugliest things I’ve ever seen. They look horrible and fake. My nails are natural/real and over an inch long…thank god ii don’t have to war these ugly fake things….ewwwe
These instructions were very unclear to me, and I personally, would rather just grow out my nails and paint them. it would be easier and they would look MUCH BETTER.
Can someone explain this more clearly to me? I found the first step impossible to follow. Thanks
omg that is so cool
Um I don’t understand this at all
Heh. kay
How do you do that because I tryed all the veoido and not one but still love it ????????????????????????????????????????????????????????
Thank you so much, I did these at home and made them just like yours. (except shorter) I really like this idea it is very creative and awesome and now I don’t have to pay every time I want my nails don. Again, thank you so much for the awesome nail tips. I really like how hard and strong tehy are even though they are made of tape, also I really like how easy they are to take off, you can simply just peel them off.
This works really nice
Put the tape on your finger so it covers the entire nail and extends past it, so the whole nail looks glossy. Do this over the lower edge of the tape, and it will wear the tape down, making the line less visible.
what does cutting out you nails mean
,cool
Can you explain it better?? I couldn’t understand much……….