 Funky Millions
Nail Art for Beginners: Tools and Techniques to Start With
Learn essential nail art tools and beginner-friendly techniques to start creating your own nail designs at home with confidence.
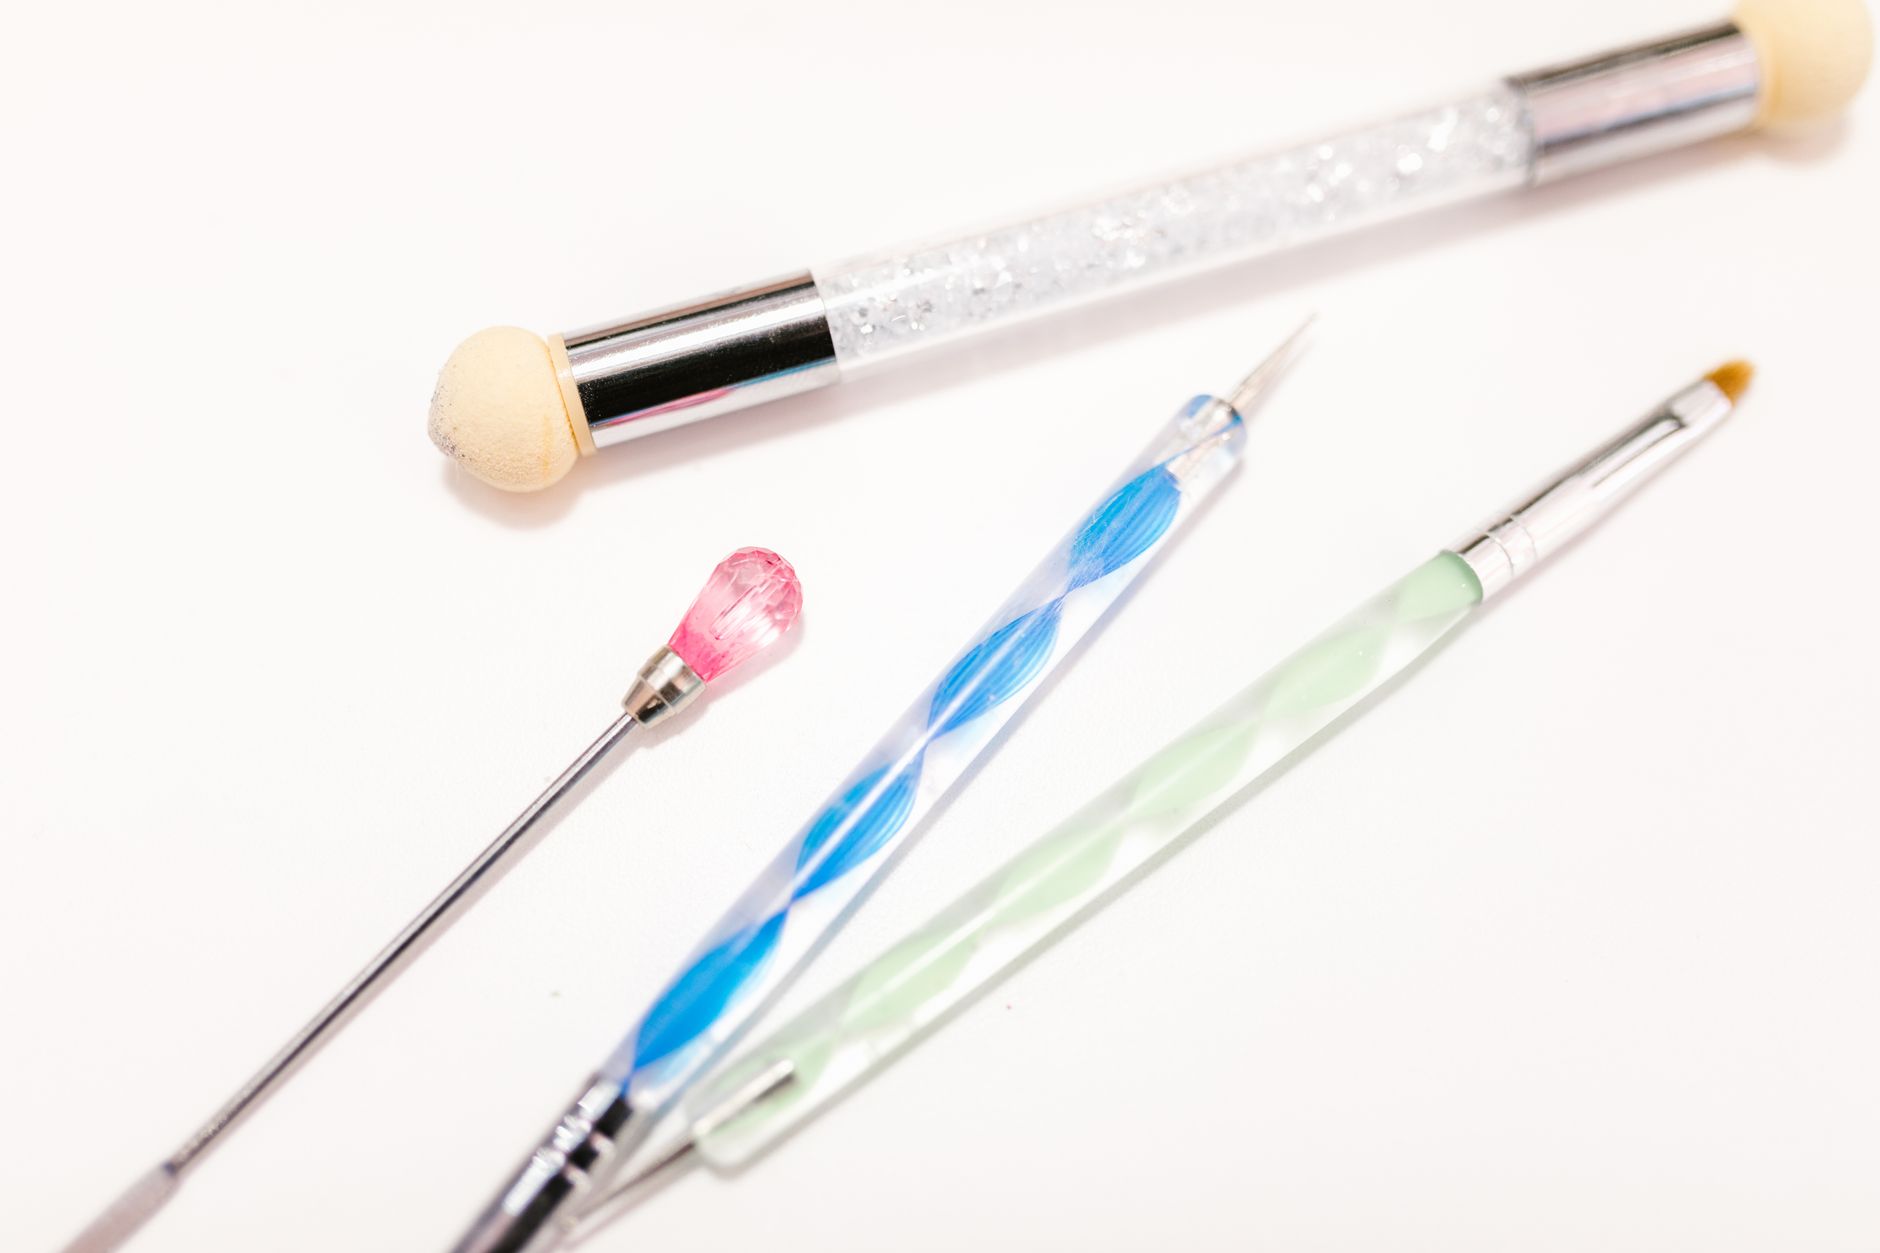
Quick summary
Key Takeaways
- A relatively small, affordable tool collection is sufficient to begin exploring several accessible nail art techniques.
- Stamping offers some of the most detailed, professional-looking results for the least amount of freehand skill required, making it particularly appealing for beginners wanting impressive results quickly.
- Tying nail art practice to seasonal themes or upcoming occasions provides helpful direction and motivation for beginners, while building a small set of confidently executed "go-to" designs removes pressure before specific events.
- Practicing on paper first and starting with a single accent nail, rather than a full set, reduces pressure and builds skill more effectively for beginners.
- Household items like bobby pins, toothpicks, and masking tape can serve as reasonable, low-cost substitutes for dedicated nail art tools while testing initial interest, though investing in purpose-built supplies produces better results once you decide to pursue the hobby more seriously.
- Video tutorials that show technique in real time, combined with engagement in nail art communities where common beginner challenges are already documented and discussed, accelerate skill development more effectively than attempting to learn purely through static images or trial and error alone.
Nail art can feel intimidating for beginners, but starting with the right tools and a few genuinely accessible techniques makes it far more approachable than the elaborate designs often shared online might suggest. This guide covers exactly what you need to get started and which techniques offer the best results-to-effort ratio for those new to nail art.
Essential Tools for Beginner Nail Art
- A quality base coat and top coat, foundational to any nail art longevity
- A dotting tool (or a simple household alternative like a bobby pin end)
- Thin nail art brushes, for detail work
- Nail polish remover and cleanup brush, for correcting mistakes cleanly
- A few basic polish colors, including a couple of neutrals and one or two accent colors
Optional Tools Worth Adding Later
- Nail stamping plates and a stamper, for more precise, repeatable designs
- Striping tape, for clean geometric lines
- Nail art brushes in various sizes, as your skill and interest develop
- Gel polish system, if you want to explore longer-lasting nail art
Technique 1: Dot Art
Dotting is widely considered the most beginner-friendly nail art technique, using a dotting tool (or household alternative) dipped in polish to create dots of varying sizes for patterns like polka dots, flowers, or abstract designs.
How to start: Practice creating consistent dot sizes on paper before attempting on nails, then experiment with simple patterns like a single accent dot per nail before progressing to more complex arrangements.
Technique 2: French Tip Variations
The classic French manicure, and its many modern variations (colored tips, reverse French, diagonal French), offers an accessible entry point into nail art that still looks polished and professional.
How to start: Use French tip guide stickers, widely available and inexpensive, to achieve clean lines while you build the freehand skill to eventually skip this guide.
Technique 3: Tape/Striping Designs
Using thin striping tape to create geometric patterns, negative space designs, or clean color-blocking is another accessible technique that does not require freehand painting skill.
How to start: Apply tape over a base color once fully dry, apply your second color, then remove the tape before the second color fully dries for the cleanest line.
Technique 4: Marble/Water Marbling
Water marbling creates a unique, swirled pattern by dropping polish into water and manipulating it before dipping the nail in, though it requires more practice and has a steeper learning curve than the previous techniques.
How to start: Practice the water technique separately from nail application first, since achieving the right marbling pattern in water takes some trial and error before you introduce your actual nail into the process.
Technique 5: Simple Stamping
Nail stamping uses pre-etched metal plates and a specialized polish to transfer detailed designs onto nails quickly, offering intricate results without requiring freehand painting skill.
How to start: Begin with simple, single-color designs before attempting multi-color stamping, which requires more precise timing and technique.
Comparison Table: Techniques by Difficulty
| Technique | Difficulty Level | Tools Needed | Time Investment |
|---|---|---|---|
| Dot art | Very easy | Dotting tool | Low |
| French tip variations | Easy | Guide stickers (optional) | Low-moderate |
| Tape/striping | Easy-moderate | Striping tape | Moderate |
| Stamping | Moderate | Stamping plates, stamper | Moderate |
| Water marbling | Moderate-advanced | Water, toothpick/tool | High |
Seasonal and Occasion-Based Nail Art Ideas for Beginners
Once basic technique feels comfortable, tying nail art practice to specific seasons or occasions provides both motivation and a natural framework for choosing color palettes and design themes, rather than facing the sometimes paralyzing question of what to create with no particular direction or purpose.
Simple seasonal themes, such as pastel dot art for spring, a single metallic accent nail for a winter holiday look, or warm-toned French tip variations for autumn, give beginners an accessible way to practice core techniques while producing designs that feel purposeful and occasion-appropriate rather than arbitrary. This approach also naturally introduces new color combinations and small variations on already-learned techniques, since a "spring" dot design and a "holiday" dot design using the same core dotting skill will still look meaningfully different due to color and placement choices alone.
For special occasions specifically, such as a birthday, holiday gathering, or vacation, having a small mental or written list of two or three "go-to" designs you feel confident executing, built from the techniques covered throughout this guide, removes the pressure of needing to learn something entirely new right before an event, allowing you to instead focus on clean, confident execution of a design you have already practiced and feel comfortable with.
Practicing Effectively
Step 1: Practice on Paper or a Practice Nail Wheel
Before applying any technique to your actual nails, practicing on paper or a reusable practice nail wheel allows you to build skill without the pressure or cleanup of a full manicure attempt.
Step 2: Start With One Accent Nail
Rather than attempting a full set of ten matching nail art designs immediately, starting with a single accent nail reduces pressure and allows focused skill-building.
Step 3: Keep Cleanup Tools Ready
Having polish remover and a small cleanup brush on hand throughout the process allows you to correct mistakes without needing to remove and restart an entire design.
Building Your Design Skills Over Time
Nail art skill genuinely develops with repeated practice, similar to any other fine motor skill. Starting with the most accessible techniques (dotting, tape designs, simple stamping) and gradually incorporating more advanced techniques (freehand painting, water marbling, multi-color stamping) as confidence builds tends to produce a more sustainable, less frustrating learning experience than attempting advanced techniques immediately.
Household Alternatives to Dedicated Nail Art Tools
For beginners uncertain whether nail art will become a lasting interest, starting with household item substitutes before investing in a dedicated tool collection is a genuinely reasonable, low-risk way to explore the hobby before committing financially to specialized supplies.
A bobby pin, with the rounded end dipped in polish, can substitute quite effectively for a dedicated dotting tool when creating dot art, offering a similar rounded application surface without any additional purchase required for those who already have bobby pins on hand. A toothpick or the sharpened end of a wooden manicure stick can serve as a rough substitute for thin detail brushes when creating simple lines or small design elements, though the precision will not fully match a proper, purpose-made nail art brush once you progress to more detailed work. For striping tape, even standard household masking tape, cut into very thin strips with sharp scissors, can work as a rough substitute for dedicated nail striping tape, though the adhesive quality and precision of dedicated nail tape will generally produce cleaner results once you decide the technique is worth the small additional investment.
These substitutions are best understood as a way to test genuine interest and build initial comfort with different techniques, rather than as permanent replacements for dedicated tools, since purpose-built nail art supplies do offer meaningfully better precision, control, and results once you have confirmed this is a hobby worth investing in more fully.
Common Mistakes to Avoid
Attempting Advanced Techniques Immediately
Starting with water marbling or intricate freehand painting before building foundational skill often leads to frustration and discouragement.
Skipping Base Coat and Top Coat
These foundational layers protect your nail art design and extend its longevity, making them worth including even for simple, beginner-level designs.
Not Allowing Adequate Drying Time Between Layers
Rushing between colors or design elements before previous layers are dry often leads to smudging and a less clean final result.
Attempting a Full Set of Ten Immediately
Starting with an ambitious full-set design before building basic skill often leads to inconsistent results and frustration, compared to starting with a single accent nail.
Finding Nail Art Inspiration and Learning Resources
Beyond tools and technique, having a consistent source of design inspiration and structured learning material significantly accelerates skill development for beginners, since attempting to invent original designs from scratch before building foundational technique often leads to frustration disconnected from the actual skill-building process.
Video tutorials, widely available across various platforms, offer a particularly valuable learning format for nail art specifically, since watching the actual hand movement, brush pressure, and timing involved in a technique conveys information that static images or written instructions alone cannot fully capture. Following along in real time with a slow, beginner-focused tutorial, pausing and rewinding as needed, tends to build technique more effectively than attempting to replicate a finished design based on a single reference photo without seeing the process that created it.
Nail art communities and forums, where beginners share both successes and failures, can also provide valuable troubleshooting insight specific to common beginner challenges, since experienced hobbyists have often already encountered and solved the exact problems a newcomer is likely to face, from polish consistency issues to specific technique adjustments for different nail shapes. Engaging with this kind of community resource, rather than troubleshooting entirely in isolation, can meaningfully shorten the learning curve for common early frustrations.
- Practice on paper or a practice wheel first, building comfort with a technique before attempting it on your actual nails.
- Start with one accent nail, rather than a full set, to build skill with lower pressure.
- Invest in quality base and top coat, since these foundational products significantly affect both appearance and longevity regardless of technique.
- Be patient with the learning curve, since nail art skill genuinely develops with repeated practice over time.
Conclusion
Nail art becomes considerably more approachable once you start with accessible techniques like dotting, tape designs, and simple stamping, rather than attempting elaborate freehand painting or water marbling immediately. Building skill gradually, starting with a single accent nail rather than a full set, and practicing on paper before your actual nails all contribute to a more sustainable, enjoyable learning experience as you develop your nail art abilities over time.
For more on choosing the right nail shape to complement your nail art, see our guide on nail shapes guide.
Category: Nail Care
Tags: nail art, beginner nail art, dotting tool, nail stamping, DIY manicure, nail design techniques, nail art tools, at-home nail art, nail care basics, nail art tutorial
Frequently Asked Questions
References
Last updated
This article is for informational purposes only and does not constitute medical advice. Consult a licensed dermatologist or healthcare provider before starting any new treatment.
Beauty & Hair Care Editor
Amanda Gurton is a beauty editor and researcher with a focus on translating dermatology and trichology insights into clear, actionable advice. She covers skincare routines, hair health, ingredient science, and everyday beauty habits.
Comments (0)
Be the first to comment.
Related Articles
Press-On Nails: A Complete Beginner's Guide
Learn everything about press-on nails, from choosing the right size to application, removal, and how to make them last longer.

Nail Shapes Guide: Which Shape Suits Your Fingers
Discover which nail shape best suits your finger and hand shape, from square to almond to coffin, with tips for choosing and filing correctly.

Nail Strengthener vs. Nail Hardener: What's the Difference?
Nail strengthener vs nail hardener: learn the real difference, which one your nails actually need, and how to use each correctly.
What Causes Nail Ridges and When to Worry
Learn what causes vertical and horizontal nail ridges, which types are normal aging changes, and when ridges signal an underlying health issue.