 Funky Millions
How to Contour and Highlight for Beginners
Learn how to contour and highlight for beginners with this step-by-step guide. Discover easy techniques, product tips, common mistakes, and flattering looks for every face shape.
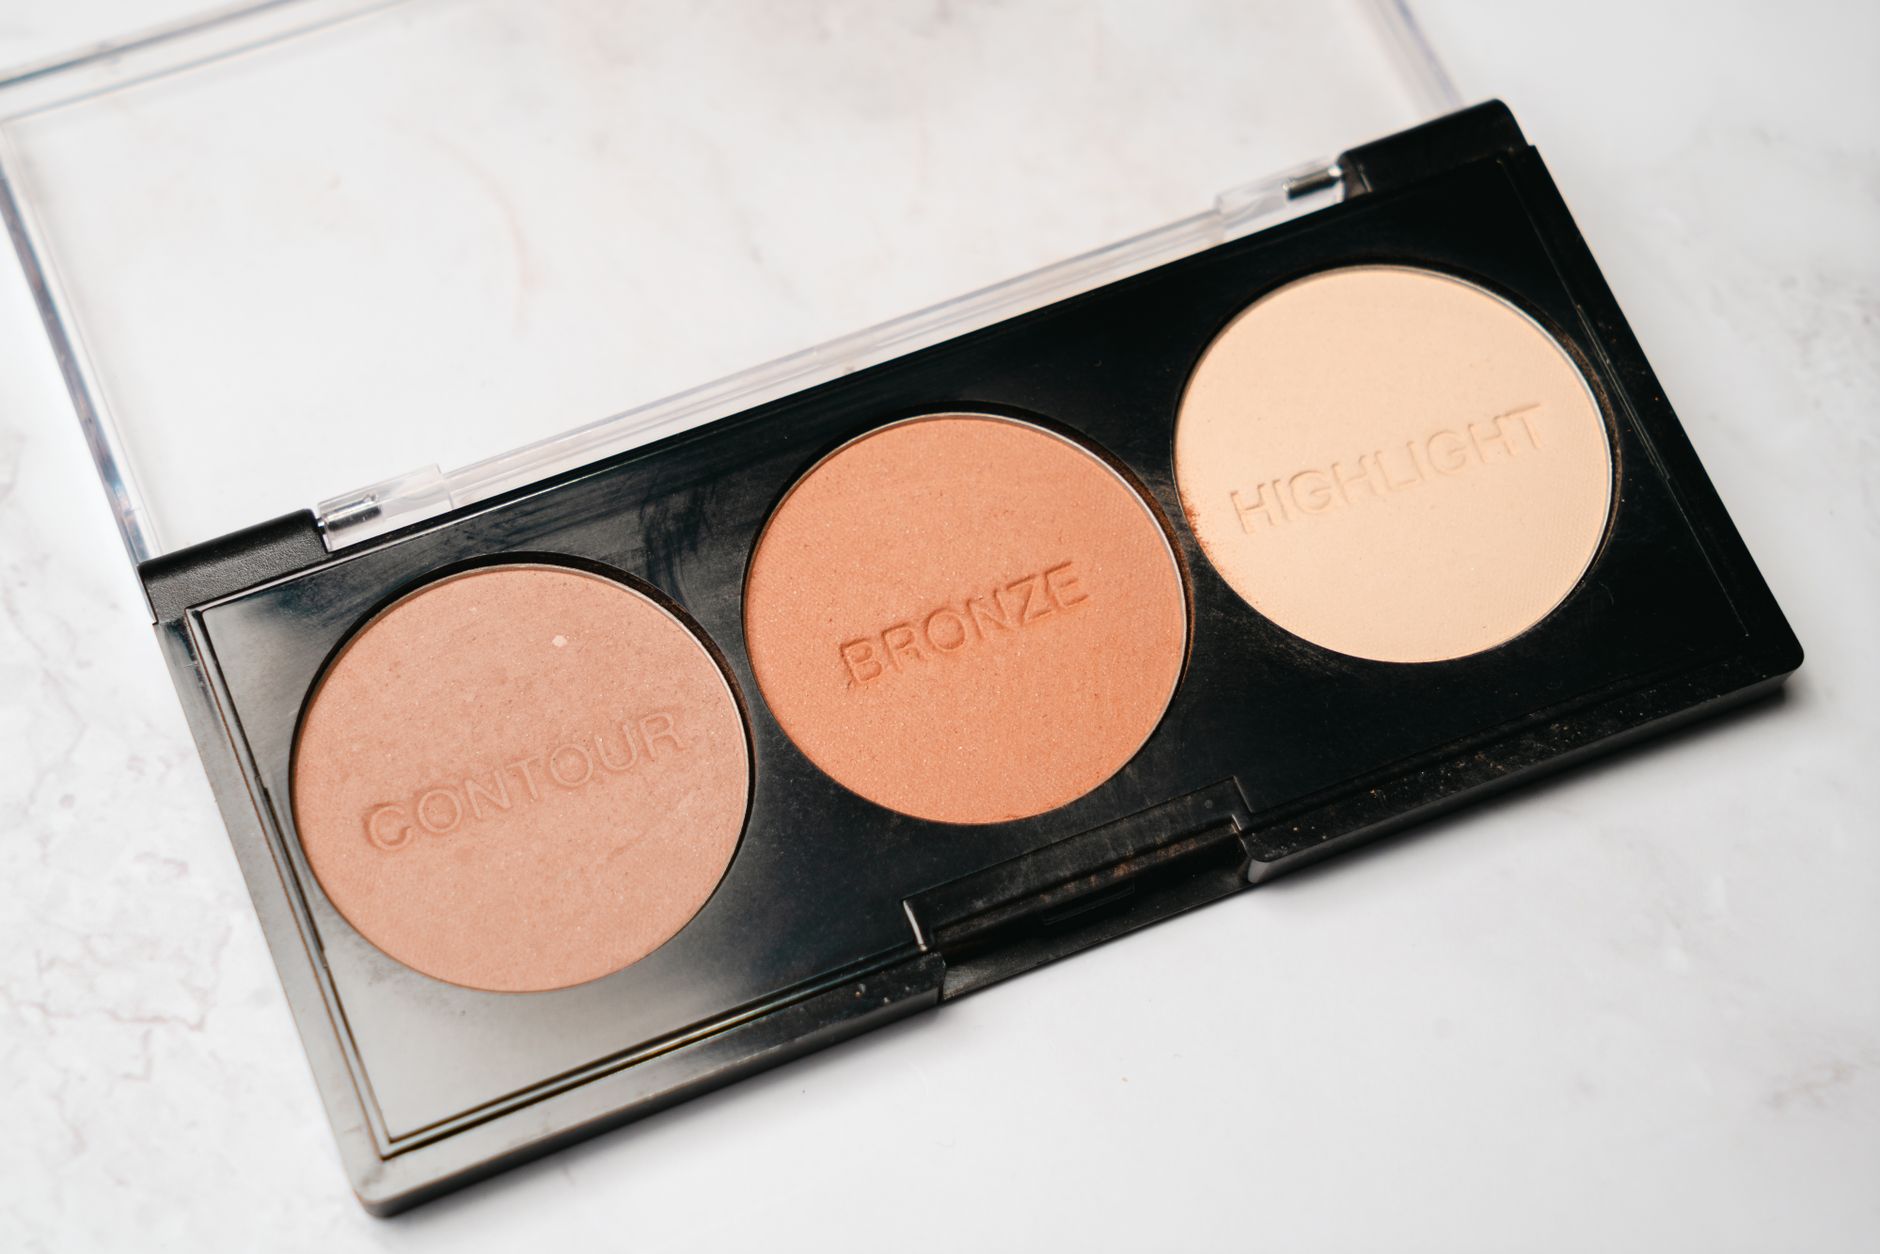
Quick summary
Key Takeaways
- Contour adds shadows to define, and highlight adds light to lift. Both work together to enhance your natural bone structure.
- Contour and highlight enhance your features, add dimension, and create a polished look that you can customize for any occasion.
- Beginners should start with powder formulas and choose contour shades that are cool or neutral, not orange.
- Prep, apply, blend, highlight, and set. Build product gradually and blend thoroughly for the most natural result.
- The biggest mistakes involve shade choice, product amount, and blending. Correct those three things and your contour will look natural.
- Contour sculpts with cool-toned shadow, while bronzer warms with sun-kissed color. They are not interchangeable.
Introduction
Learning how to contour and highlight for beginners can feel intimidating when you see complex tutorials online, but the truth is that sculpting your face with makeup is simpler than it looks. Contouring creates subtle shadows to define your bone structure, while highlighting adds light to the high points of your face for a lifted, radiant finish. Together, these two techniques can enhance your natural features without making you look overdone.
You do not need a professional kit or years of experience to get started. With the right products, a few soft brushes, and a little patience, you can create a flattering look that works for everyday wear or special occasions. The key is to build color gradually and blend thoroughly so the result looks seamless in natural daylight.
In this guide, you will learn exactly what contouring and highlighting are, why they matter, how to choose products for your skin tone, and a simple step-by-step routine you can follow at home. We will also cover common beginner mistakes, expert tips, product recommendations, and answers to the most frequently asked questions. By the end, you will feel confident adding contour and highlight to your makeup routine.
What Are Contouring and Highlighting?
Contouring and highlighting are makeup techniques that use light and shadow to shape the face.
Contouring means applying a cool-toned or neutral matte product that is one to two shades deeper than your skin tone to the areas where natural shadows fall. These areas typically include the hollows of the cheeks, the sides of the nose, the jawline, the temples, and the hairline. The goal is to create the illusion of depth and structure.
Highlighting means applying a lighter product to the areas of the face that naturally catch light. These include the tops of the cheekbones, the bridge of the nose, the brow bone, the center of the forehead, the cupid's bow, and the chin. Highlighters can be matte or shimmery depending on the finish you prefer.
When used together, contour and highlight balance each other. Contour recedes, highlight advances, and the contrast between the two creates dimension that flatters every face shape.
Why Contour and Highlight? The Benefits
Understanding why contouring and highlighting matter will help you use these techniques with purpose rather than just following a trend.
Enhances Natural Bone Structure
Contouring mimics the natural shadows your face already produces under directional light. By reinforcing those shadows, you can make your cheekbones look higher, your jawline more defined, and your nose more sculpted.
Adds Dimension to the Face
Foundation and concealer even out skin tone, but they can also flatten the face. Highlighting brings back the dimension that base makeup removes, giving the skin a more three-dimensional appearance.
Creates a Polished, Lifted Look
A touch of highlighter on the high points of the face catches light with every movement. This creates a fresh, awake, and healthy appearance that works for both natural and glam makeup.
Customizable for Any Occasion
You can keep contour and highlight soft for work or build it up for photos and evening events. The same products work for many looks when applied with different pressure and blending techniques.
Works on Every Face Shape
Unlike some makeup trends that suit only certain features, contouring and highlighting can be adapted for round, oval, square, heart-shaped, and long faces. The placement changes, but the principles stay the same.
Contour and Highlight Products: What Beginners Should Know
Choosing the right formula makes learning how to contour and highlight for beginners much easier. There are three main types of contour and highlight products.
Powder Contour and Highlight
Powder formulas are the most beginner-friendly. They blend easily, are forgiving if you apply too much, and work well over liquid or powder foundation. Choose a matte bronzer or contour powder without orange undertones, and pair it with a pressed or loose highlighter.
Cream Contour and Highlight
Cream products melt into the skin and give a natural, skin-like finish. They work best over liquid or cream foundation and require a damp sponge or dense brush to blend. Creams are ideal for dry skin or anyone who wants a dewy look.
Liquid Contour and Highlight
Liquid formulas offer the most control and blend seamlessly into foundation. They are great for detailed work, such as nose contouring, but they can be tricky to layer if you are new to makeup.
How to Choose Shades
| Product | Shade Recommendation | Undertone Tip |
|---|---|---|
| Contour | 1–2 shades deeper than skin | Cool or neutral; avoid orange |
| Bronzer | 1–2 shades deeper than skin | Warm; use for warmth, not sculpting |
| Highlight | 1–2 shades lighter than skin | Match undertone; champagne suits most |
For fair skin, look for taupe or light gray-brown contour shades. Medium skin tones can use neutral browns. Deep skin tones look beautiful in rich chocolate or espresso contour shades with neutral or warm undertones.
Tools You Will Need
You do not need dozens of brushes, but a few quality tools will make the process easier.
- Angled contour brush: Perfect for cheek hollows and jawline.
- Fluffy blending brush: Essential for softening edges.
- Small eyeshadow brush: Great for nose contour and detailed areas.
- Fan brush or small highlighter brush: Applies highlighter precisely.
- Beauty sponge: Helps blend cream and liquid products seamlessly.
- Setting powder: Keeps cream products in place and prevents creasing.
Pro Tip: Clean brushes blend better. Wash your tools once a week to prevent streaky application and breakouts.
Step-by-Step Guide: How to Contour and Highlight for Beginners
This routine is designed to be simple, buildable, and flattering for everyday makeup.
Step 1: Prep Your Skin
Start with a clean, moisturized face. Apply primer if you want your makeup to last longer and look smoother. Proper skin prep is the foundation of good makeup. If your skin is dull or dry, a gentle skincare routine can help your makeup sit better throughout the day. You may also want to read our guide on how to make your skin glow for prep tips that boost radiance before makeup.
Step 2: Apply Foundation and Concealer
Apply your regular foundation and concealer to even out your skin tone. Set any creamy concealer with a light layer of setting powder so your contour and highlight blend smoothly on top.
Step 3: Identify Your Face Shape
Before placing product, look in the mirror and identify your face shape. This determines where contour and highlight will be most flattering.
Step 4: Apply Contour
Dip your angled brush lightly into contour powder and tap off the excess. Apply to the following areas:
- Cheekbones: Suck in your cheeks and apply contour to the hollow, blending upward toward the ear.
- Jawline: Apply along the underside of the jaw and blend downward into the neck.
- Temples and hairline: Sweep across the temples and along the upper forehead to balance the face.
- Sides of the nose: Use a small brush to draw two thin lines down the sides of the nose, then blend.
Start with less product than you think you need. It is easier to add more than to remove excess.
Step 5: Blend, Blend, Blend
Use a clean fluffy brush or sponge to blend every contour line until you see no harsh edges. The goal is a soft shadow, not a visible stripe.
Step 6: Apply Highlighter
Apply highlighter to the areas that naturally catch light:
- Tops of the cheekbones
- Bridge and tip of the nose
- Brow bone
- Center of the forehead
- Cupid's bow
- Chin
Use a light hand and build gradually. If you prefer a natural finish, choose a matte or satin highlighter.
Step 7: Set Your Makeup
Lightly mist your face with setting spray or apply a thin layer of translucent powder to lock everything in place. This step helps your contour and highlight last all day.
Contour Placement by Face Shape
Different face shapes benefit from slightly different contour placement. Use this table as a quick reference.
| Face Shape | Contour Focus | Highlight Focus |
|---|---|---|
| Round | Cheek hollows, jawline, temples | Center of forehead, chin, cheekbones |
| Oval | Minimal contour on temples and under cheekbones | Forehead, chin, bridge of nose |
| Square | Jawline corners, temples | Center of forehead, chin, cheekbones |
| Heart | Lower cheekbones, narrow jawline | Center of forehead, chin, below cheekbones |
| Long | Hairline, under chin | Cheekbones, brow bone, center of nose |
The goal is always balance. Contour the areas you want to recede and highlight the areas you want to bring forward.
Common Mistakes Beginners Make
Even with the best products, technique matters. Here are the most common mistakes and how to avoid them.
Using the Wrong Shade
A contour that is too warm or too dark looks muddy or unnatural. Choose a cool or neutral shade that is only slightly deeper than your skin tone.
Applying Too Much Product
Start with a small amount and build up. Heavy contour is harder to blend and can look harsh in daylight.
Skipping Blending
Unblended contour lines are the biggest giveaway of a beginner look. Take your time and blend until the edges disappear.
Contouring Over Texture
If you have active breakouts, heavy texture, or very dry patches, contour can emphasize those areas. A smooth base helps. For help creating a clearer canvas, check out our post on how to get clear skin.
Highlighting Everywhere
Highlighting too many areas at once can make the face look greasy or overly shiny. Focus on the high points and keep the rest of the skin matte or satin.
Ignoring Lighting
Always check your makeup in natural light before leaving the house. Indoor lighting can hide harsh lines that daylight reveals.
Product Recommendations for Beginners
You do not need luxury products to contour and highlight well. Look for these types of products based on your budget and skin type.
Budget-Friendly Options
- A neutral matte bronzer or contour powder
- A pressed powder highlighter in champagne or pearl
- A small angled brush and blending brush set
Mid-Range Options
- A contour and highlight duo or palette
- A cream contour stick paired with a liquid highlighter
- Quality synthetic brushes that wash well
Luxury Options
- A buildable contour and highlight palette with multiple shades
- A finely milled highlighter for a lit-from-within glow
- Professional-grade brushes for precise application
Pro Tip: If you are unsure about shades, visit a beauty counter or use a brand with a generous return policy. Testing in natural light is the best way to find your match.
Contour vs. Bronzer: What Is the Difference?
Many beginners confuse contour and bronzer, but they serve different purposes.
| Feature | Contour | Bronzer |
|---|---|---|
| Purpose | Create shadows and sculpt | Add warmth and sun-kissed color |
| Undertone | Cool or neutral | Warm |
| Finish | Matte | Matte or satin |
| Placement | Hollows, jawline, temples, nose | Cheeks, forehead, nose bridge |
| Effect | Defines structure | Adds warmth and glow |
You can use both in the same look. Apply contour first to sculpt, then add bronzer where the sun would naturally hit your face for warmth.
How to Contour and Highlight for Different Skin Tones
Contouring and highlighting work on every skin tone when the shades are right.
Fair Skin
Look for taupe, gray-brown, or light cocoa contour shades. Avoid orange or very dark browns. Highlighters in pearl, champagne, or soft pink work beautifully.
Medium Skin
Neutral to warm brown contours blend well. Champagne, gold, and peach highlighters add a flattering glow.
Olive Skin
Choose contour shades with a neutral or slightly cool undertone to avoid looking orange. Gold and bronze highlighters complement olive tones.
Deep Skin
Rich espresso, deep cocoa, and mahogany contour shades create beautiful definition. Gold, copper, and bronze highlighters pop against deep skin.
These tips will help you take your contour and highlight from basic to beautiful.
- Use a light hand: It is easier to add product than to remove it.
- Blend in natural light when possible: This prevents over-application.
- Choose a matte contour for the most natural shadow: Shimmer in contour can look unnatural.
- Match your undertone: Cool undertones suit taupe contours; warm undertones suit neutral browns.
- Set cream products with powder: This increases longevity and prevents transferring.
- Contour before blush: Blending blush over contour helps everything look cohesive.
- Use a clean brush for final blending: A brush with no product on it softens everything.
- Practice with one feature at a time: Master cheek contour before moving on to the nose or jawline.
If you want your overall makeup to look fresh without heavy coverage, explore our beauty tips without makeup for skin-first approaches.
Conclusion
Now you know how to contour and highlight for beginners with confidence. Start with powder products, choose the right shades for your skin tone, and remember that blending is the most important step. With a little practice, you will be able to sculpt and glow in a way that looks natural and flattering.
If you found this guide helpful, share it with a friend who is learning makeup too. Then explore more FunkyMillions beauty guides to keep building your skills.
Categories: Makeup
Tags: contouring, highlighting, beginner makeup, face makeup, makeup tutorial, beauty tips, makeup techniques, how to contour, how to highlight, natural makeup
Frequently Asked Questions
References
Last updated
This article is for informational purposes only and does not constitute medical advice. Consult a licensed dermatologist or healthcare provider before starting any new treatment.
Beauty & Hair Care Editor
Ilma is a beauty editor who specializes in breaking down cosmetic ingredients, skincare routines, and hair care practices. Her work focuses on evidence-based guidance readers can trust and apply.
Comments (0)
Be the first to comment.
Related Articles
Natural Makeup Look Tutorial: A Step-by-Step Guide
Master the perfect natural makeup look tutorial with easy steps, expert tips, and product advice. Achieve a fresh, radiant finish that enhances your features effortlessly.
How to Apply Mascara Without Clumps
Discover how to apply mascara without clumps with our step-by-step guide. Learn expert tips, common mistakes to avoid, and the best tools for flawless lashes.
Makeup Mistakes That Age Mature Skin (and What to Do Instead)
Discover common makeup mistakes that can age mature skin, from wrong product textures to outdated techniques, and learn what to do instead.
Makeup Tips for Glasses Wearers
Learn makeup techniques specifically for glasses wearers, from eyeshadow adjustments to brow shaping, for a look that works with your frames.